Wednesday 23 September 2015

SMF Discolouring Fragrance Challenge

SMF Soap Challenges

I help to organise a monthly challenge on www.soapmakingforum.com. I ran the August challenge which tackled inverted stamping.

You can find the challenge thread and read about everyone's experiences along the way here

http://www.soapmakingforum.com/showthread.php?t=55467

and you can find the thread with all the lovely entries here

http://www.soapmakingforum.com/showthread.php?t=55760

There is also an SMF challenge youtube channel with tutorial videos for all the challenges, including my inverted stamping one, along with other tutorials by SMF members that you may find useful.

https://www.youtube.com/channel/UC9bN3rFKI_AyHN1ses6bpfQ

As long as you have been a member of the forum for a short period and have posted 50 times, then you can participate in the challenge. Come over and find us on SMF, we are a friendly bunch and always willing to accept new members into the fold.

Discolouring Fragrance Challenge

This month was a discolouring fragrance challenge run by GalaxyMLP, the basic rules of the challenge were to use a fragrance that discolours and incorporate that into your soap design. You also had to choose a colour scheme for a famous brand or sports team and incorporate that into your design too.

Below is the original challenge thread if you would like to read the full challenge criteria and see people's discussion of their experiences of the challenge

http://www.soapmakingforum.com/showthread.php?t=56017

Here is the entry thread

http://www.soapmakingforum.com/showthread.php?p=547174

And here is my entry.

I chose to use Wimbledon as my theme as I love the combination of purple, green and white.


I used a basic slow moving recipe at a 5% superfat of -

25% Palm
25% Coconut
25% Sunflower
25% Olive

The discolouring fragrance I used was porridge oats from gracefruit which I used at 3%. The description  says it discolours to a dark tan.

I wanted to try a sort of different butterfly swirl with this challenge. I tilted the mould slightly to one side, then filled it with 1/4 of the discoloured batter, then I alternately poured the white purple and green until the mould was half full. I then used a hanger in a circular motion to create the bottom half of the butterfly. Then I poured in some more discoloured batter and drop swirled the colours in on top to create the top wing of the butterfly.

Here is the soap when it was first cut


And here is my final entry after 3 weeks of discolouration


I hope you like it. If you are interested in the challenges please pop  over to www.soapmakingforum.com and see what is going on this month.


Friday 18 September 2015

Great Cakes Soapworks September Challenge - The Clyde Slide


Here is my entry for this month's Great Cakes Soapworks challenge. This is my attempt at a Clyde Slide.


This was a hard technique for me. It took me several attempts to achieve the feathering which is the signature of this technique. I am pleased with my entry though in the end!

I wanted to do something a bit different with my pour for this challenge. My aim was to pour the white base colour in at the back of the bowl and simultaneously pour the brown and green so they met in the middle. The aim was to produce a soap that had a different colour on each side rather than a homogeneous mix of colours, which I feel I managed to achieve. I quite like the symmetrical look that it creates.

Here is a picture of the bowl as I poured. I used a washing up bowl to pour into as I found that using the regular jug that I make soap batter in didn't seem to have a big enough surface area. I was trying to find something similar to the big round bowl Clyde uses in his videos. I waited until I had reached a medium trace before pouring.


I propped the left hand end of the log mould up slightly by about an inch and poured in one solid sweep from left to right, then laid the mould back down flat.

I chose a standard recipe with palm, olive, coconut and sunflower oils. I have been thinking about making Christmas soaps recently which is why I chose the colour scheme, it reminds me of peppermint creams so I scented with a peppermint fragrance oil. I used brown and green mica from White Ape Pigments and titanium dioxide.

Here is another attempt that I made that I was quite pleased with


I cut the top off one of the soaps to trim it down and it looks like there are some lovely feathers in the horizontal plane too. It might be cool to try cutting the soap that way next time instead to see what is revealed.


I think the one on the right looks like an angel. 

I feel like I should write a separate blog post called  'How not to do a Clyde slide' as it took  me quite a few attempts to get the technique to work how I wanted it to! Here is a run down of what I learnt the hard way if you are interested in reading it.

Amy's tutorial said that pouring the batter too thick would prevent the feathers from developing. I think I took this too literally with my first attempts. I poured them so thin that the autumn coloured soap which started out as several lovely shades of red, orange and yellow, turned into an unpleasant homogeneous brown.


My second blue attempt was slightly thicker trace, but I still didn't achieve any feathers. I think the soap still turned out fairly pretty though. I poured the grey base background, then poured pools of dark and light blue on alternative sides of the pot to try and achieve a soap which was half dark and half light, similar to my entry soap but in a jug. The soaps are really pretty and I like them a lot, but they don't demonstrate the feathering at all. I think this was because the batter was too thin and the jug too cramped.


My third attempt was a green, blue and white soap. This time I waited much longer before pouring and I chose to use a mixing bowl with a much larger pouring surface area than the plastic jug I had originally been using. This is the first time I actually achieved any feathers at all. I think this shows that the type of container you use to make your pour into is very important, you need a large surface area. I think you also need your trace not to be too thin or you end up with too much mixing and the
feathers won't appear.

I think these bars look like they have smiley faces.


I will definitely be using this technique again. I love the way it produces such different results each time, and I always seem to be able to see images and pictures in the bars. Thank you to Amy and Clyde for bringing us something really  new and different to try. 


Thursday 18 June 2015

Ebru Art - June Great Cakes Soapworks Challenge

Here is my entry for this month's Great Cakes Soapworks Challenge. This month's theme was 'Ebru Art'. This is a turkish style of water marbling where dyes are floated on the top of a water gel base and manipulated to create beautiful designs. The main guidelines were to make sure your design had some form of ebru inspiration and that you only used a single skewer or tool to create your design.


I had several attempts at this challenge and it was harder than I thought it would be. (I always seem to say that! My husband said 'that's why they are called challenges!').

Most of the images of ebru art that I searched for were floral themed and  I absolutely loved the roses that can be seen in the images below.

The roses below are by ebru artist Mukadder Kavas and can be purchased here
https://olsaolsa.com/en/traditional-arts/66-paper-marbling-ebru-rose.html
I didn't just want to recreate an ebru design though. I wanted to put some of my own personality into the art so I chose to create ebru style roses with a 'roses and castles' twist.

I grew up in the Worcestershire countryside where there are many canals and I absolutely love the 'roses and castles' style of artwork that is traditionally used to decorate the boats. As the name suggests roses and castles are often depicted in the artwork and bright vibrant primary colours are always used to create the designs.

Below the example of 'Roses and Castles' art which I used to inspire my design.


I wanted to fragrance my soap with a rose scent to match with my theme, but the only rose fragrance I have is very tricky to work with. It rices badly, so I made the scented base soap first and added the unscented ebru layer afterwards. 

The base soap recipe was made with oils I had on hand.
20% Coconut
25% Sunflower
25% Olive oil
30% Palm oil

I used up some paprika infused sunflower oil to make the base so it was and orange/peach colour. 

The top layer was high in lard for a really slow trace.
50% Lard
20% Sunflower
30% Olive oil

I had to work really quickly to mix up all the colours so that I had  plenty of time to make my design.  They were powdered mineral pigments and oxides with added liquid colourant for extra vibrancy so I mixed them in a small amount of glycerine to make sure they would mix into the batter with ease and the colour would be smooth and not clumpy. 

Colourants used
Blue - Ultramarine oxide
Green - Chromium Green Oxide mixed with green mica
Red - Red Iron Oxide mixed with red liquid colourant
Yellow - Yellow Iron Oxide mixed with yellow liquid colourant
White - Titanium Dioxide
Black - Activated Charcoal


I poured the black top layer and then used squeeze bottles to apply the coloured soap batter to the surface. I then used a skewer to create the designs and added some finishing touches with the squeeze bottles. I don't have any pictures of the process as I had to work really quickly to get the design done while the batter was still really fluid. 

I placed a lid onto the box after finishing the soap as I find that covering the soap really helps to prevent ash forming. That is why I use lined plastic boxes as moulds as the clip on lids fit tightly and there is no chance of ruining the surface of the soap. 


Here are some of the other attempts I made for this challenge, there were quite a lot of them!


This went wrong so I just messed it all around with a skewer. I still think it looks kind of cool though!


Thanks again Amy for another great challenge. I am really excited to find out what the next three months challenges will be.

Thursday 14 May 2015

Great Cakes Soapworks May Challenge : Mini Desserts

This has been the hardest challenge for me yet. I have not made soap into dessert shapes, or used melt and pour before so it felt very daunting at the beginning. I was not short of ideas on what to make, but working out how to achieve them was the difficult part. I know the main purpose of this challenge was to make soap art, so functionality was not as important, but it is difficult for me to think about making something that would not be used so I tried to make all my desserts as functional as possible.


1. Mango Chia Pudding

Food ingredients - Chia seeds, coconut milk
Inspiration - http://www.ashleyneese.com/mango-chia-pudding/

Inspiration Photo


The first desserts I made were mini mango chia puddings. I have been eating a lot of chia at the moment so I already had some to use. Chia has been becoming more popular at the moment in cosmetic products too. The texture of chia pudding on it's own with surfactant added was not likely to hold it's shape properly, so I decided to make it into a shower jelly. It has always been something I have wanted to try, but hadn't  got around to it yet so I thought this was the ideal opportunity.

I started by making the mango coloured part. I used the recipe for 1% agar soap jelly found here.
http://curious-soapmaker.com/how-to-make-lush-like-shower-jelly.html
I used Sodium cocoyl isethionate as the surfactant as that is what I had available to me. I coloured it with red and yellow liquid colourant until I reached a mango colour and poured it into some plastic shot glasses and allowed it to set. I unmoulded some of the set jelly and cut it into chunks to be used as mango chunks to decorate the top of the soap. Then I made another batch of jelly using coconut milk as the liquid and added about 2tbsp chia seeds. I poured it on top of the mango layers and allowed it to set. Before it had completely set, I added the mango coloured chunks to the top.

I haven't used these yet, but I am looking forward to it as I think the chia seeds will provide some gentle exfoliation.


2. Swedish Princess Cake

Food ingredients - Oats, Cows milk powder, honey, sugared butterflies
Inspiration - http://korenainthekitchen.com/2013/05/27/daring-bakers-prinsesstarta/
Inspiration Photo


The second dessert is a Swedish Princess cake. I made some cold process soap with powdered oats, milk and honey. The sugar in the milk and honey made it easier to mould into dome shaped balls and the oats made it the colour of a baked cake. I then made some soap fondant using melt and pour, cornflour and glycerine, using the recipe given to us. I dyed it green with liquid soap colourant to represent the icing on the cakes. I rolled it out and used it to cover the soap balls. This was not an easy task as the soap fondant isn't quite the same texture as actual cake fondant. I then wrapped the base of the cakes with ribbon and secured it with a pin. I decorated the top with some sugar butterflies.


3. Naked Coffee Layer Cake

Food ingredients - Espresso Coffee, Cocoa Powder.
Inspiration - http://www.belleaukitchen.com/2013/11/toffee-coffee-and-vanilla-naked-layer.html

Inspiration Photo


The third dessert is a naked coffee layer cake. I made the soap layers from cold process soap. The brown layers are coffee soap with added coffee grounds and espresso added to the lye water. The white rounds are the same soap, but with the water content made up with water only and no coffee grounds added. I didn't have a mould the correct size so I made the soap in a log mould and used a metal cookie cutter to cut out the circular cake layers to the size and shape I required. The icing is made from foaming bath butter and melt and pour whipped together with cocoa powder added to give it the brown colour. I used it to stick the cake layers together and pipe the top. I used some soap curls of the coffee cold process top to decorate the top.


4. Rose Apple Tart

Food Ingredients - Cocoa powder, beer.
Inspiration - http://hipfoodiemom.com/2013/10/30/guest-post-apple-walnut-tart-with-maple-custard-from-baking-a-moment/

Inspiration Photo


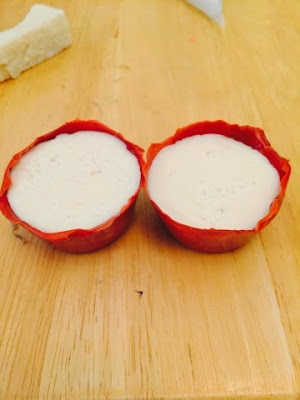
I made some more soft cold process soap with beer and cocoa powder added which I allowed to cure for a few days then rolled into balls in my hands until it was warm enough to mould into the bottom of a muffin pan lined with cling film. Once it had reached room temperature again, it was hard enough to hold it's shape and the same consistency as a pie crust. I then used melt and pour for the first time. I only had clear base so I coloured it with titanium dioxide and a bit of cocoa powder and yellow iron oxide to achieve a creamy apple colour, I also coloured some more base with red iron oxide to represent the apple skin. I poured the melted red soap into a silicone muffin mould and tilted it to coat the sides with the soap until it set. This meant there was a 3mm layer of soap on the inside of the muffin moulds. I then filled the insides with the cream melt and pour. Once it had set, I unmoulded it and used a cheese wire to cut it horizontally into slices. I cut each slice in half down the middle and was left with something that resembled apple slices with a small layer of red skin attached. I curled these up into a rose shape and inserted them into the brown cocoa pie crusts, setting them in place with more of the cream melt and pour to represent the custard.


Thanks again Amy and also thank you to Cee for showing us all these techniques. Another very challenging challenge, but I enjoyed being forced out of my cold process comfort zone for a change. I don't think I will be using melt and pour again in the near future as I find it really fiddly and time consuming, and if I never have to see any soap fondant again it will be a day too soon! I now have an even greater admiration for those of you make these creations on a regular basis.

I am really, really excited about next month's ebru challenge. I can't wait to get started!