1. Mango Chia Pudding
Food ingredients - Chia seeds, coconut milk
Inspiration - http://www.ashleyneese.com/mango-chia-pudding/
 |
| Inspiration Photo |
The first desserts I made were mini mango chia puddings. I have been eating a lot of chia at the moment so I already had some to use. Chia has been becoming more popular at the moment in cosmetic products too. The texture of chia pudding on it's own with surfactant added was not likely to hold it's shape properly, so I decided to make it into a shower jelly. It has always been something I have wanted to try, but hadn't got around to it yet so I thought this was the ideal opportunity.
I started by making the mango coloured part. I used the recipe for 1% agar soap jelly found here.
http://curious-soapmaker.com/how-to-make-lush-like-shower-jelly.html
I used Sodium cocoyl isethionate as the surfactant as that is what I had available to me. I coloured it with red and yellow liquid colourant until I reached a mango colour and poured it into some plastic shot glasses and allowed it to set. I unmoulded some of the set jelly and cut it into chunks to be used as mango chunks to decorate the top of the soap. Then I made another batch of jelly using coconut milk as the liquid and added about 2tbsp chia seeds. I poured it on top of the mango layers and allowed it to set. Before it had completely set, I added the mango coloured chunks to the top.
I haven't used these yet, but I am looking forward to it as I think the chia seeds will provide some gentle exfoliation.
2. Swedish Princess Cake
Food ingredients - Oats, Cows milk powder, honey, sugared butterflies
Inspiration - http://korenainthekitchen.com/2013/05/27/daring-bakers-prinsesstarta/
 |
| Inspiration Photo |
The second dessert is a Swedish Princess cake. I made some cold process soap with powdered oats, milk and honey. The sugar in the milk and honey made it easier to mould into dome shaped balls and the oats made it the colour of a baked cake. I then made some soap fondant using melt and pour, cornflour and glycerine, using the recipe given to us. I dyed it green with liquid soap colourant to represent the icing on the cakes. I rolled it out and used it to cover the soap balls. This was not an easy task as the soap fondant isn't quite the same texture as actual cake fondant. I then wrapped the base of the cakes with ribbon and secured it with a pin. I decorated the top with some sugar butterflies.
3. Naked Coffee Layer Cake
Food ingredients - Espresso Coffee, Cocoa Powder.
Inspiration - http://www.belleaukitchen.com/2013/11/toffee-coffee-and-vanilla-naked-layer.html
 |
| Inspiration Photo |
The third dessert is a naked coffee layer cake. I made the soap layers from cold process soap. The brown layers are coffee soap with added coffee grounds and espresso added to the lye water. The white rounds are the same soap, but with the water content made up with water only and no coffee grounds added. I didn't have a mould the correct size so I made the soap in a log mould and used a metal cookie cutter to cut out the circular cake layers to the size and shape I required. The icing is made from foaming bath butter and melt and pour whipped together with cocoa powder added to give it the brown colour. I used it to stick the cake layers together and pipe the top. I used some soap curls of the coffee cold process top to decorate the top.
4. Rose Apple Tart
Food Ingredients - Cocoa powder, beer.
Inspiration - http://hipfoodiemom.com/2013/10/30/guest-post-apple-walnut-tart-with-maple-custard-from-baking-a-moment/
 |
| Inspiration Photo |


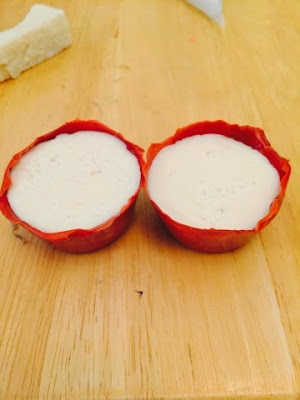
I made some more soft cold process soap with beer and cocoa powder added which I allowed to cure for a few days then rolled into balls in my hands until it was warm enough to mould into the bottom of a muffin pan lined with cling film. Once it had reached room temperature again, it was hard enough to hold it's shape and the same consistency as a pie crust. I then used melt and pour for the first time. I only had clear base so I coloured it with titanium dioxide and a bit of cocoa powder and yellow iron oxide to achieve a creamy apple colour, I also coloured some more base with red iron oxide to represent the apple skin. I poured the melted red soap into a silicone muffin mould and tilted it to coat the sides with the soap until it set. This meant there was a 3mm layer of soap on the inside of the muffin moulds. I then filled the insides with the cream melt and pour. Once it had set, I unmoulded it and used a cheese wire to cut it horizontally into slices. I cut each slice in half down the middle and was left with something that resembled apple slices with a small layer of red skin attached. I curled these up into a rose shape and inserted them into the brown cocoa pie crusts, setting them in place with more of the cream melt and pour to represent the custard.
Thanks again Amy and also thank you to Cee for showing us all these techniques. Another very challenging challenge, but I enjoyed being forced out of my cold process comfort zone for a change. I don't think I will be using melt and pour again in the near future as I find it really fiddly and time consuming, and if I never have to see any soap fondant again it will be a day too soon! I now have an even greater admiration for those of you make these creations on a regular basis.
I am really, really excited about next month's ebru challenge. I can't wait to get started!


